
Manage Server Notifications or Error Message
Since WHM is a user-friendly tool, it can help you manage your server. It can also notify you when certain activities are taken (or triggers). WHM can communicate in a number of different ways. Additionally, WHM has the ability to alert you to a variety of events. In WHM’s Contact Manager, each of these may be controlled and given a priority.
Accessing The Contact Manager
Step One: Log into your WHM Administrative Dashboard.
Step Two: From WHM, you can go into the Upper left, and search for Contact Manager to find the option. This will be under Server Contacts.
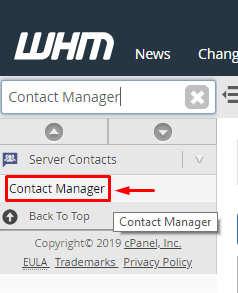
Step Three: Click on Contact Manager to be brought to the main page (This will default to the Communcation Type tab).
Different Communication Types
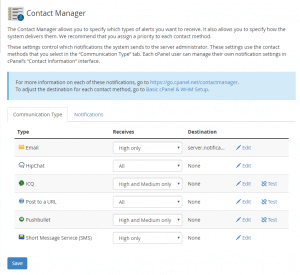
With the WHM Contact Manager, you can select which priorities of events the communication method will receive. This can also be used to get a quick link to edit the details for the communication method, such as the Email Address or information used.
i) Changing Priority
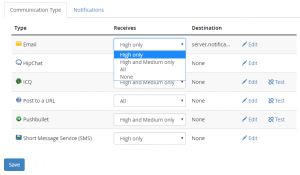
You can choose the importance of the warnings that will be given through each communication type by using the drop-down next to it. High Only, High and Medium Only, All (Will send for High, Medium, and Low priority events), and None are the options that are available (Not used). You must click the blue Save button at the bottom to save changes if you alter the priority of the events that the Communication Type will receive.
ii) Change Email Communication Destination
Firstly: First navigate to the Communication Type tab on the Contact Manager page in WHM.
Secondly: Then Click Edit to the far Right of the Email option in the list of Communication Types.
Thirdly: This will bring you to a new page where you are able to enter in an Email address. This may already have a value. You can change or input the new email address there.
Step Four: Once you are done making the changes you would like to the Email address, you can click the Blue Save Changes button towards the bottom to save the change.
iii) Change Hipchat Communication Destination
Firstly: Navigate to the Communication Type tab on the Contact Manager page in WHM.
Secondly: Next Click Edit to the far Right of the Hipchat option in the list of Communication Types.
Thirdly: Clicking this will bring you to a new page where you are can enter in a Hipchat User or Room name. This may already have a value, though this can be changed.

Step Four: Once done making any necessary modifications, you can click on Save Changes to save the new change.
iv) Change ICQ Communication Destination
Firstly: Navigate to the Communication Type tab on the Contact Manager page in WHM.
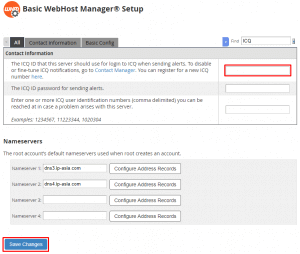
Secondly: Click Edit to the far Right of the ICQ option in the list of Communication Types.
Thirdly: Clicking this will bring you to a new page where you are can enter in an ICQ ID, as well as a password (and any identification numbers). This may already have a value, though these values can be changed if needed.

Step Four: Once done making any changes, click Save Changes at the bottom to save any edits you made.
v) Changing The Post To A URL Destination
Firstly: Navigate to the Communication Type tab on the Contact Manager page in WHM.
Secondly: Click Edit to the far Right of the Post to a URL option in the list of Communication Types.
Thirdly: This will take you to a new page where you can enter in a list or single URL where POST Requests will be sent. This will have a specific structure and will contain the hostname, subject and body of the message being sent.
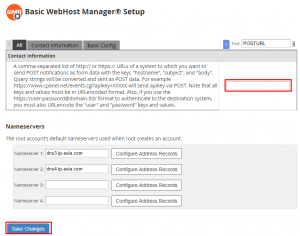
Step Four: After you enter in any URLs that you want the notifications to be sent to, you can save the changes by clicking Save Changes towards the bottom.
vi) Changing Pushbullet Communication Destination
Firstly: Navigate to the Communication Type tab on the Contact Manager page in WHM.
Secondly: Click Edit to the far Right of the Pushbullet option in the list of Communication Types.
Thirdly: Here you will be at a page where you can specify the API Token for Pushbullet. This will be used for the Notifications sent using this communication type.
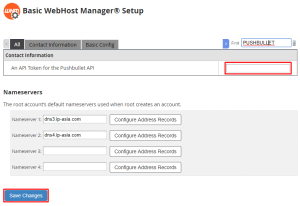
Step Four: After entering in, or updating your Pushbullet API Key, you can click Save Changes at the bottom to save the new API Key.
vii) Change SMS Communication Destination
Firstly: Navigate to the Communication Type tab on the Contact Manager page in WHM.
Secondly: Click Edit to the far Right of the Short Message Service (SMS) option in the list of Communication Types.
Thirdly: From this next page, you are able to enter in the cell phone or pager email address here, where you can receive SMS Notifications with the events as well.
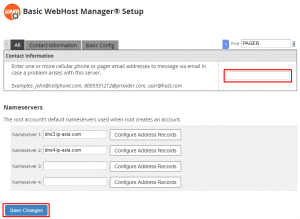
Step Four: After entering in the email for the SMS Messages, click Save Changes to make the changes persistent.
Notifications Through WHM
When on the Contact Manager page for WHM, there will be a tab for Notifications. This will show a list of all the notifications that will be sent by WHM.
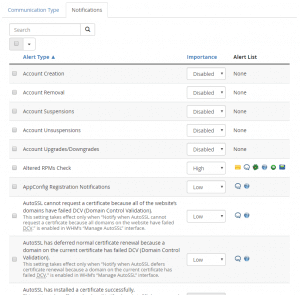
You can choose the priority on which the notification is sent for each choice. Which Communication Types are used to retrieve the sent alerts will depend on the priority. There is a cPanel documentation page that describes each Notification option in greater detail, so you can learn what each one is for there.
